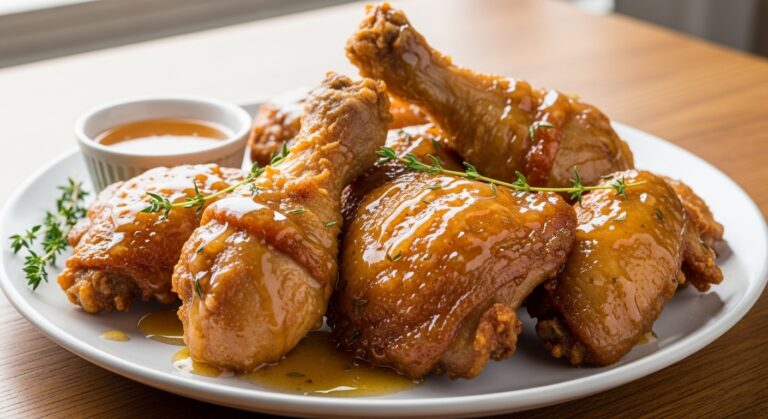
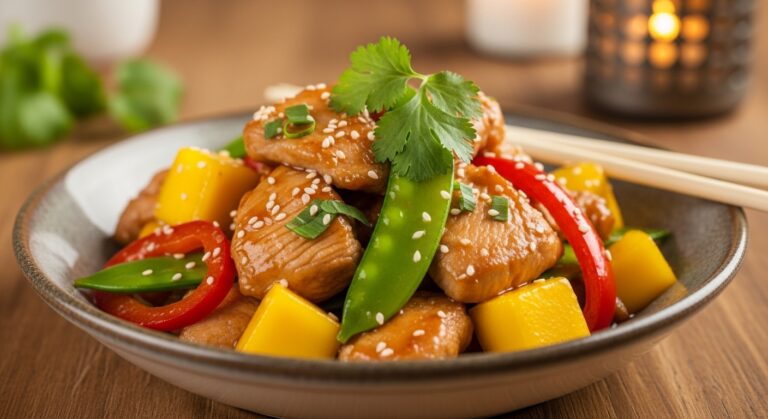
Best EVER Chicken Fried Chicken Recipe
Crispy, golden, and bursting with Southern comfort flavors, Chicken Fried Chicken is the ultimate homestyle dinner with a diner-quality twist. This beloved dish features tender chicken cutlets coated in a seasoned, crunchy breading, fried to perfection, and smothered in rich, peppery country gravy for a stunning finish. It’s the kind of meal that fills the whole house with incredible aromas and draws everyone straight to the table for that first satisfying crunch.
Each bite delivers a heavenly combination of textures—crispy coating, juicy chicken, velvety gravy, and perfectly seasoned layers with savory fried flavors, peppery kick, buttery richness, and aromatic herb notes. Whether you’re making dinner for Sunday suppers or serving at family gatherings, this chicken fried chicken is as rewarding to make as it is to devour. Add your favorite touches like extra black pepper, hot sauce, fresh herbs, or a drizzle of honey for a colorful, customizable meal that feels like classic diner comfort at home.
Why You’ll Love This Chicken Fried Chicken
- Restaurant-quality crunch: Perfectly crispy coating that stays crunchy even under the gravy.
- Juicy, tender chicken: Tenderized cutlets ensure fork-tender results every time.
- Homemade country gravy: Rich, peppery gravy made from the pan drippings for authentic flavor.
- Comfort food classic: Southern tradition that satisfies soul and stomach completely.
- Impressive but achievable: Looks fancy but uses simple techniques anyone can master.
Preparation Phase & Tools to Use (Essential Tools and Equipment, Plus Why They Matter)
Before diving into this delicious Chicken Fried Chicken, having the right tools on hand will make everything smoother—from prep to clean-up.
Essential Tools & Why You Need Them:
Meat Mallet or Rolling Pin
This is the MVP of the recipe. It tenderizes and flattens chicken to ensure even cooking and maximum tenderness.
Large Cast-Iron Skillet or Heavy-Bottom Pan
Essential for maintaining consistent oil temperature and achieving that perfect golden crust.
Three Shallow Dishes or Pie Plates
Perfect for setting up your breading station—flour, egg wash, and final coating assembly line.
Cooking Thermometer
Ideal for monitoring oil temperature (350°F is the sweet spot) and checking chicken doneness (165°F internal).
Wire Rack Over Baking Sheet
Best for draining fried chicken while keeping the bottom crispy—no soggy coating.
Whisk
Precision matters—especially for smooth, lump-free gravy that coats the back of a spoon.
Tongs
For safely turning chicken in hot oil without piercing the coating and losing juices.
Having these items prepped and within reach makes the cooking process seamless and safe.
Preparation Tips
- Pound chicken to even thickness for uniform cooking without dry edges or raw centers.
- Let breaded chicken rest for 10-15 minutes before frying so the coating adheres better.
- Maintain oil temperature between 325-350°F for perfectly cooked, golden chicken without greasiness.
- Don’t crowd the pan or the temperature drops and you get soggy, greasy coating.
- Use the drippings for gravy for authentic flavor that ties the whole dish together.
- Season every layer including the flour, egg wash, and final coating for maximum flavor.
These small touches make a big difference in taste, texture, and presentation.
Ingredients for This Chicken Fried Chicken
Here’s everything you’ll need to bring this crispy, comforting chicken fried chicken to life. Most of the ingredients are simple staples with diner-quality results.
For the Chicken:
- 4 boneless, skinless chicken breasts (about 6 oz each)
- 1½ cups all-purpose flour (divided)
- 1 teaspoon garlic powder
- 1 teaspoon onion powder
- 1 teaspoon paprika
- 1 teaspoon black pepper
- 1 teaspoon salt
- ½ teaspoon cayenne pepper (optional, for heat)
- 2 large eggs
- ½ cup buttermilk
- 1 tablespoon hot sauce (optional)
- Vegetable oil for frying (about 2 cups)
For the Country Gravy:
- 3 tablespoons reserved pan drippings (or butter)
- 3 tablespoons all-purpose flour
- 2 cups whole milk
- ½ teaspoon black pepper (or more to taste)
- ¼ teaspoon salt
- Pinch of garlic powder
- Pinch of cayenne (optional)
For Serving:
- Mashed potatoes
- Coleslaw or green beans
- Fresh black pepper for garnish
- Chopped fresh parsley
Optional Additions:
- Biscuits for serving
- Hot sauce or pepper sauce
- Honey drizzle
- Pickles on the side
- Fried eggs on top
- Extra crispy coating (add cornstarch to flour)
Everything in this list balances crispy exterior with tender interior—the seasoned breading pairs perfectly with that rich, peppery gravy. The additions are optional but give the dish a personalized, elevated finish.
Step 1: Prepare the Chicken
Place each chicken breast between two sheets of plastic wrap or parchment paper. Using a meat mallet or rolling pin, pound the chicken to an even ½-inch thickness throughout. This ensures even cooking and creates tender cutlets. Pat the chicken dry with paper towels and season both sides lightly with salt and pepper. Set aside while you prepare the breading station.
Step 2: Set Up the Breading Station
In the first shallow dish, combine 1 cup flour, garlic powder, onion powder, paprika, 1 teaspoon black pepper, 1 teaspoon salt, and cayenne pepper if using. Mix well. In the second dish, whisk together the eggs, buttermilk, and hot sauce if using until smooth. In the third dish, place the remaining ½ cup flour mixed with an additional ½ teaspoon each of salt and pepper. This triple-dip method creates the crispiest coating.
Step 3: Bread the Chicken
Working with one piece at a time, dredge the chicken in the first flour mixture, coating both sides and shaking off excess. Dip into the egg mixture, letting excess drip off. Finally, press into the seasoned flour again, making sure to coat thoroughly and press the coating onto the chicken to adhere. Place on a wire rack and repeat with remaining pieces. Let the breaded chicken rest for 10-15 minutes—this helps the coating stick during frying.
Step 4: Heat the Oil
Pour vegetable oil into a large cast-iron skillet or heavy-bottom pan to a depth of about ½ inch (roughly 1½-2 cups depending on pan size). Heat over medium-high heat until the oil reaches 325-350°F on a cooking thermometer. To test without a thermometer, drop a small pinch of flour into the oil—if it sizzles immediately and browns within 30 seconds, it’s ready. Adjust heat as needed to maintain temperature.
Step 5: Fry the Chicken
Carefully place 2 chicken cutlets in the hot oil, being careful not to overcrowd. Fry for 4-5 minutes on the first side without moving them, until deep golden brown and crispy. Using tongs, carefully flip and fry for another 4-5 minutes on the second side until golden brown and the internal temperature reaches 165°F. Transfer to a wire rack set over a baking sheet to drain. Repeat with remaining chicken, allowing oil to return to temperature between batches.
Step 6: Make the Country Gravy
After frying all the chicken, carefully pour off all but 3 tablespoons of the pan drippings (or use butter if you prefer). Return the skillet to medium heat. Sprinkle the 3 tablespoons of flour over the drippings and whisk constantly for 1-2 minutes until the mixture turns golden and smells nutty (this is the roux). Slowly pour in the milk while whisking constantly to prevent lumps. Continue whisking and bring to a simmer. Cook for 3-5 minutes, stirring frequently, until the gravy thickens enough to coat the back of a spoon. Season with black pepper, salt, garlic powder, and cayenne if desired. Taste and adjust seasonings—country gravy should be well-peppered.
Step 7: Serve
Place the fried chicken on serving plates or a platter. Generously ladle the hot country gravy over each piece, letting it pool around the chicken. Garnish with freshly ground black pepper and chopped parsley if desired. Serve immediately while the chicken is hot and crispy, accompanied by your favorite sides like mashed potatoes, green beans, or coleslaw.
Notes
Make It Extra Crispy: Add ¼ cup cornstarch to the flour mixture for an even crunchier coating.
Buttermilk Substitute: Mix ½ cup milk with ½ tablespoon lemon juice or vinegar. Let sit 5 minutes.
Baked Version: For a lighter option, bake breaded chicken at 425°F for 20-25 minutes, flipping once, though it won’t be as crispy.
Spice It Up: Increase cayenne or add hot sauce to the gravy for extra kick.
Watch Out for These Mistakes While Cooking
- Not pounding chicken evenly: Thick parts stay raw while thin parts overcook. Uniform thickness is essential.
- Oil temperature too low: Results in greasy, soggy coating that absorbs oil instead of crisping up.
- Oil temperature too high: Burns the outside before the inside cooks through. Maintain 325-350°F.
- Skipping the resting time: Coating falls off during frying without that 10-15 minute rest period.
- Overcrowding the pan: Drops oil temperature dramatically and creates steam instead of crispy fry.
- Moving chicken too early: Let it develop a crust before flipping or the breading tears off.
- Not seasoning the flour: Bland breading ruins the dish. Season every layer generously.
- Lumpy gravy: Always whisk constantly when adding milk and use room-temperature milk for smoothest results.
What to Serve With Chicken Fried Chicken?
This rich, satisfying chicken is a meal in itself with gravy, but classic Southern sides create the complete comfort food experience. Whether you’re going traditional or creative, there’s an option for every preference.
8 Delicious Recommendations:
Creamy Mashed Potatoes
The ultimate base for soaking up every drop of that peppery country gravy.
Buttermilk Biscuits
Fluffy, buttery biscuits are perfect for mopping up gravy and completing the Southern spread.
Southern Green Beans
Slow-cooked green beans with bacon provide a savory, tender vegetable side.
Creamy Coleslaw
Tangy, crunchy slaw cuts through the richness and adds refreshing contrast.
Mac and Cheese
Creamy, cheesy comfort pairs beautifully with crispy fried chicken for the ultimate indulgence.
Corn on the Cob
Sweet, buttery corn adds brightness and seasonal freshness to the plate.
Fried Okra
Crispy fried okra doubles down on Southern tradition and adds great texture variety.
Black-Eyed Peas
Hearty, savory black-eyed peas with bacon provide protein and authentic Southern flavor.
These pairings help round out the meal and bring a restaurant-level feel to your dinner table.
Storage Instructions
Chicken Fried Chicken is best enjoyed fresh, but leftovers can be stored and reheated with good results if done properly.
How to Store:
Refrigerator: Store fried chicken and gravy separately in airtight containers for up to 3 days. Keep chicken uncovered for the first hour of cooling to prevent steam from softening the coating.
Freezer: Freeze breaded, uncooked chicken for up to 1 month. Thaw in refrigerator before frying. Cooked chicken can be frozen up to 2 months, though coating loses some crispiness.
Room Temperature: Not recommended—cooked chicken must be refrigerated within 2 hours for food safety.
Reheating Instructions:
Oven (Best Method): Preheat to 375°F. Place chicken on a wire rack over a baking sheet and bake for 15-20 minutes until heated through and coating re-crisps.
Air Fryer: Reheat at 375°F for 8-10 minutes for the crispiest results—works even better than the oven.
Microwave (Not Recommended): Coating becomes soggy, but if necessary, heat in 30-second intervals until warm.
Gravy: Reheat gently on stovetop over low heat, whisking frequently. Add a splash of milk if it’s too thick.
Estimated Nutrition (Per Serving – Based on 4 Servings)
Please note this is an approximate breakdown and may vary based on exact ingredients used.
| Nutrient | Amount Per Serving |
|---|---|
| Calories | 625 |
| Protein | 48g |
| Carbohydrates | 42g |
| Dietary Fiber | 2g |
| Sugar | 6g |
| Total Fat | 28g |
| Saturated Fat | 8g |
| Unsaturated Fat | 18g |
| Trans Fat | 0g |
| Cholesterol | 205mg |
| Sodium | 890mg |
This hearty meal delivers satisfying comfort—perfect for special dinners and Sunday suppers in generous, filling portions.
Frequently Asked Questions
1. Can I make Chicken Fried Chicken ahead of time?
You can bread the chicken up to 4 hours ahead and refrigerate, but frying is best done just before serving for maximum crispiness.
2. What’s the difference between chicken fried chicken and chicken fried steak?
Chicken fried chicken uses chicken cutlets, while chicken fried steak uses cube steak (beef). The preparation method is identical.
3. Can I use chicken thighs instead of breasts?
Absolutely! Boneless, skinless thighs work beautifully and stay even more moist. Pound them to even thickness first.
4. Why is my breading falling off?
Common causes: chicken wasn’t dry enough, coating wasn’t pressed on firmly, or you didn’t let it rest before frying.
5. Can I make this without buttermilk?
Yes, use regular milk mixed with 1 tablespoon lemon juice or vinegar. Let it sit 5 minutes to curdle slightly.
6. How do I know when the chicken is done?
Use a meat thermometer—internal temperature should reach 165°F. Visual cue: juices run clear when pierced.
7. Can I make the gravy without pan drippings?
Yes, use 3 tablespoons of butter instead. It won’t have quite the same depth but will still be delicious.
8. How do I keep the first batch warm while frying the rest?
Place cooked chicken on a wire rack in a 200°F oven to keep warm and crispy while you finish frying.
Conclusion
Chicken Fried Chicken is the ultimate combination of crispy satisfaction and comfort food soul—all fried to golden perfection in one iconic dish. With its crunchy seasoned coating, juicy tender chicken, and rich peppery gravy, it’s everything you love about Southern diner classics, made achievable in your own kitchen.
Perfect for Sunday dinners, special occasions, or anytime you need serious comfort food, this chicken fried chicken is as rewarding to make as it is to eat. Plus, with customizable seasonings and endless side options, you can make it uniquely yours. So grab your skillet and make dinner something everyone remembers!