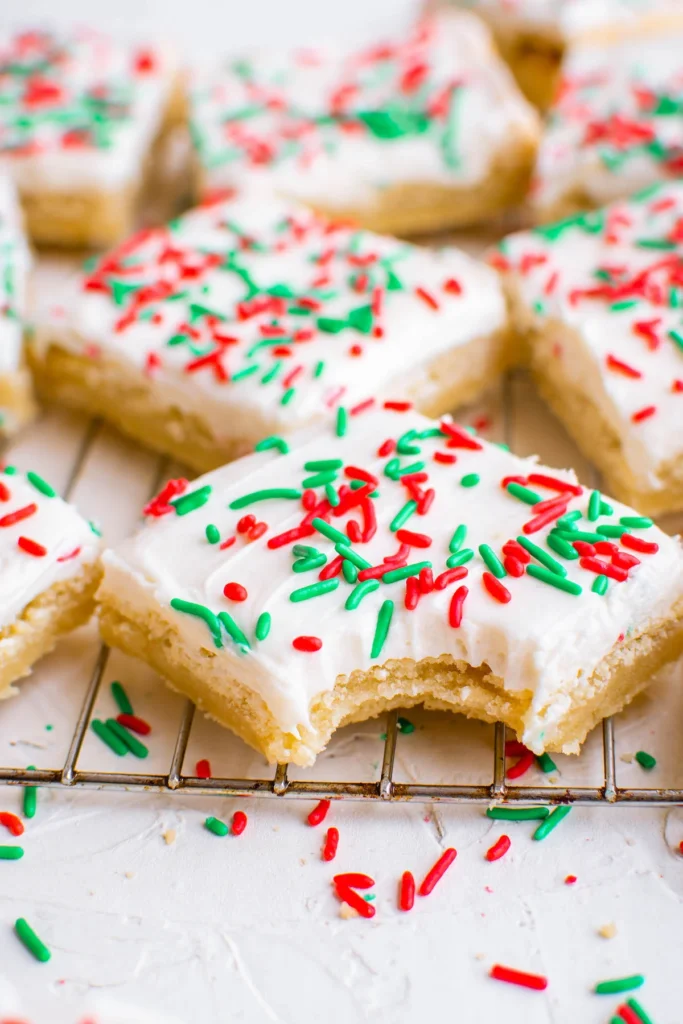
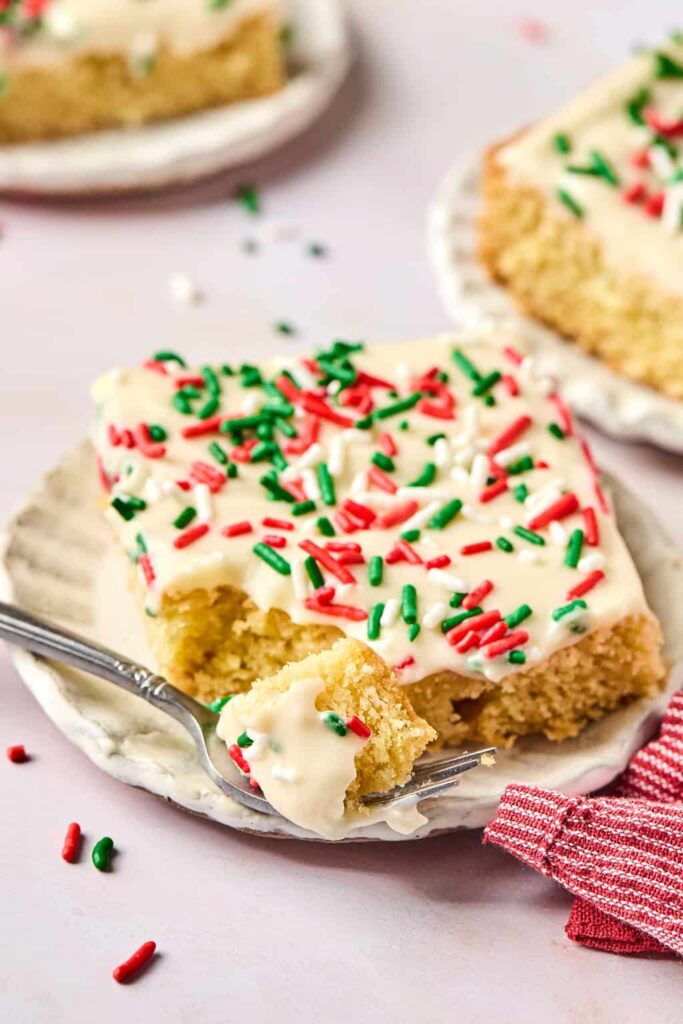
Christmas Cookie Bars – Easy Sugar Cookie Bar Recipe With Sprinkles
I love treats that capture the magic of the holiday season, and Christmas Cookie Bars are exactly that. They bring together the perfect balance of buttery cookie base, festive colors, and sweet toppings that make them irresistible, making them one of my favorite go-to recipes for holiday gatherings and cookie exchanges. The best part? They’re incredibly easy to make and feed a crowd without the hassle of rolling, cutting, and baking dozens of individual cookies.
Whether you’re preparing for a Christmas party or looking for a festive dessert to share with neighbors, these cookie bars never disappoint. The soft, chewy texture combined with colorful sprinkles and sweet frosting creates an unforgettable treat that embodies everything wonderful about Christmas baking. If you’re looking for a way to make holiday baking both beautiful and stress-free, this recipe will quickly become your seasonal favorite.
Why You’ll Love These Christmas Cookie Bars
This recipe is a winner for many reasons. First, it’s remarkably simple compared to traditional cut-out cookies. You can have them mixed, baked, and decorated in a fraction of the time it takes to make individual cookies. The thick, chewy bars have that classic sugar cookie flavor everyone loves, and the final result is a perfect combination of soft texture and festive appearance. It’s a dessert that feels special and celebratory but doesn’t require advanced baking skills or specialty equipment. Plus, you can customize the decorations to match any holiday theme, making them versatile for everything from office parties to family gatherings.
What Kind of Flour Should I Use for Christmas Cookie Bars?
When it comes to this recipe, I recommend using all-purpose flour. It provides the perfect structure and texture for cookie bars that are soft and chewy without being cakey. Make sure to measure your flour correctly by spooning it into the measuring cup and leveling it off—this prevents the bars from becoming too dense. However, if you want a slightly more tender result, you can substitute up to 1/4 cup of the all-purpose flour with cake flour for an even softer texture.
Options for Substitutions
If you’re looking to make a few swaps based on what you have at home, here are a few options to consider:
- Butter to Margarine: While butter gives the best flavor, margarine can work in a pinch, though the taste will be slightly different.
- Vanilla Extract to Almond Extract: For a more traditional sugar cookie flavor, you can use half vanilla and half almond extract.
- Regular Sprinkles to Holiday-Themed Toppings: Feel free to use crushed candy canes, mini chocolate chips, or festive M&Ms for different variations.
Ingredients for these Christmas Cookie Bars
- All-Purpose Flour: Provides the structure and foundation for the bars, creating that perfect cookie texture.
- Unsalted Butter: Adds rich, creamy flavor and helps create a tender, melt-in-your-mouth consistency.
- Granulated Sugar: Sweetens the bars and helps create a slightly crispy edge while keeping the center soft.
- Eggs: Bind all the ingredients together and add moisture, ensuring the bars hold their shape.
- Vanilla Extract: Brings warm, sweet flavor that enhances all the other ingredients.
- Baking Powder: Provides just enough lift to keep the bars from being too dense while maintaining that chewy texture.
- Salt: Balances the sweetness and enhances all the flavors in the cookie base.
- Powdered Sugar: Used for the frosting, it creates a smooth, sweet topping that melts in your mouth.
- Milk: Thins the frosting to the perfect spreading consistency.
- Food Coloring: Optional but festive, it adds those classic Christmas colors to your frosting.
- Holiday Sprinkles: The finishing touch that makes these bars look festive and fun.
Step 1: Prepare the Pan
Preheat your oven to 350°F (175°C). Line a 9×13-inch baking pan with parchment paper, leaving some overhang on the sides for easy removal. Lightly grease the parchment with cooking spray.
Step 2: Mix the Dough
In a large bowl, cream together the softened butter and granulated sugar until light and fluffy, about 2-3 minutes. Beat in the eggs one at a time, then add the vanilla extract. In a separate bowl, whisk together the flour, baking powder, and salt. Gradually add the dry ingredients to the wet ingredients, mixing until just combined.
Step 3: Spread in Pan
Transfer the dough to the prepared pan and spread it evenly using an offset spatula or the back of a spoon. The dough will be thick, so take your time spreading it to all corners.
Step 4: Bake
Bake for 20-25 minutes, or until the edges are lightly golden and a toothpick inserted into the center comes out clean. The bars should still be soft in the center—don’t overbake.
Step 5: Cool Completely
Remove from the oven and let the bars cool completely in the pan on a wire rack. This is crucial for clean cutting and proper frosting adhesion.
Step 6: Frost and Decorate
In a medium bowl, whisk together powdered sugar, milk, and food coloring (if using) until smooth. Spread the frosting evenly over the cooled bars. Immediately top with festive sprinkles before the frosting sets. Let the frosting set for about 30 minutes, then cut into squares.
How Long to Bake the Christmas Cookie Bars
The ideal baking time for these bars is 20 to 25 minutes in a preheated 350°F (175°C) oven. The exact time can vary depending on your oven and the thickness of your bars. You’ll know they’re done when the edges are lightly golden and the center is set but still soft to the touch. A toothpick inserted in the center should come out with just a few moist crumbs—not wet batter. If you want softer bars, err on the side of less time; for slightly crispier edges, bake toward the 25-minute mark.
Tips for Perfect Christmas Cookie Bars
- Use Room Temperature Ingredients: Softened butter and room-temperature eggs mix more easily and create a better texture.
- Don’t Overmix: Once you add the flour, mix just until combined. Overmixing can make the bars tough.
- Even Spreading: Take time to spread the dough evenly in the pan. Thin spots will overbake while thick spots stay underdone.
- Cool Completely Before Frosting: Warm bars will melt the frosting and create a mess. Patience pays off here.
- Add Sprinkles Immediately: Sprinkles stick best when the frosting is still wet. Don’t wait too long after spreading the frosting.
Watch Out for These Mistakes While Baking
- Overbaking: These bars should be soft and chewy, not hard. Remove them when they’re just set, even if they seem slightly underdone.
- Using Cold Butter: Cold butter won’t cream properly with the sugar, resulting in a dense texture. Always use softened butter.
- Cutting Too Soon: If you cut the bars before they’re completely cool, they’ll crumble and fall apart. Wait at least an hour.
- Too Much Flour: Adding too much flour makes the bars dry and cakey. Measure carefully by spooning and leveling.
- Frosting Before Cooling: Frosting warm bars will cause it to melt and slide off, creating a sticky mess instead of a pretty finish.
What to Serve With Christmas Cookie Bars?
Hot Chocolate
Rich, creamy hot chocolate is the perfect beverage pairing for these sweet, festive bars.
Eggnog
Traditional eggnog, whether spiked or virgin, complements the vanilla flavor beautifully.
Peppermint Tea
A light, refreshing tea that cleanses the palate between sweet bites.
Vanilla Ice Cream
Serve the bars slightly warm with a scoop of vanilla ice cream for an indulgent dessert.
Coffee Bar
Set up a coffee station with various flavors and creamers for a holiday dessert spread.
Fresh Berries
Strawberries or raspberries add a fresh, tart contrast to the sweet bars.
Whipped Cream
A dollop of fresh whipped cream adds an extra layer of indulgence.
Sparkling Cider
Non-alcoholic sparkling cider makes these bars feel extra celebratory for all ages.
Storage Instructions
Store your Christmas Cookie Bars in an airtight container at room temperature for up to 5 days. Layer the bars between sheets of parchment paper to prevent them from sticking together. The frosting will stay fresh and the bars will maintain their soft, chewy texture throughout the storage period.
For longer storage, these bars can be frozen. Wrap unfrosted bars individually in plastic wrap, then place them in a freezer-safe container. Freeze for up to 3 months. Thaw at room temperature and frost just before serving for the best appearance and texture. You can also freeze frosted bars, but the sprinkles may bleed slightly when thawed.
Estimated Nutrition (Per Bar – Based on 24 Bars)
- Calories: 195
- Protein: 2g
- Fat: 8g
- Saturated Fat: 5g
- Carbohydrates: 29g
- Sugar: 21g
- Fiber: 0g
- Cholesterol: 35mg
- Sodium: 85mg
These values are approximate and can vary depending on the exact brands and measurements used.
Frequently Asked Questions
How do I know when the bars are done baking?
The edges should be lightly golden and the center should be set but still soft. A toothpick inserted in the center should come out with a few moist crumbs, not wet batter.
Can I make these without frosting?
Absolutely! The bars are delicious on their own. You can simply dust them with powdered sugar instead of frosting.
What if I don’t have parchment paper?
You can grease and flour the pan well, but parchment paper makes removal much easier and prevents sticking.
Can I prepare these bars ahead of time?
Yes! You can bake them up to 2 days ahead and store them unfrosted, then add frosting on the day you plan to serve them.
Why are my bars too cakey?
This usually means too much flour was added or they were overbaked. Make sure to measure flour correctly and check for doneness early.
Can I use salted butter instead of unsalted?
You can, but reduce the added salt in the recipe by half to avoid overly salty bars.
How do I get clean cuts?
Use a sharp knife wiped clean between each cut. Chilling the frosted bars for 15 minutes before cutting also helps.
Can I add chocolate chips to the dough?
Definitely! Fold in 1 cup of mini chocolate chips or white chocolate chips for extra festivity and flavor.
Conclusion
Christmas Cookie Bars are more than just a holiday dessert—they’re a time-saving solution that brings joy and festive cheer to any gathering. Whether you’re baking for a crowd or creating treats for your family, these bars offer the perfect combination of classic sugar cookie flavor and holiday magic in an easy, shareable form. Plus, with endless decoration possibilities, you can make them uniquely yours every time you bake. Add this recipe to your holiday baking list—it’s destined to become a cherished tradition that you’ll look forward to making year after year.